登入
登入
How to Enable Secure Boot (for Windows 11 and Anti-Cheat)

Short answer: Reboot into the UEFI, switch to Advanced Mode, then set two things: Compatibility Support Module (CSM) to Disabled and the firmware TPM to Enabled. Only then can you turn on Secure Boot under the Boot tab. If Secure Boot state reads "Setup" instead of "User", install the default Secure Boot keys. Verify in Windows with msinfo32.
Most people meet Secure Boot because a game refuses to launch. Valorant, EA Sports FC and Battlefield 6 all use anti-cheat that requires it, and without it you get an error popup or nothing at all. It is also required for newer operating system features and for drive encryption tools like BitLocker.
The reason it trips people up is that Secure Boot is not one setting. It depends on two others being correct first, and if you go straight for the Secure Boot toggle you will find it greyed out or ineffective.
Before you start: update your UEFI
Make sure your motherboard UEFI (also called the BIOS) is up to date before changing any of this. Older firmware is where most of the odd Secure Boot behaviour comes from. Our guide to updating your motherboard BIOS covers the process.
Step 1: Get into the UEFI and into Advanced Mode
Restart the PC and press Delete at the splash screen. On some boards F2 works instead.
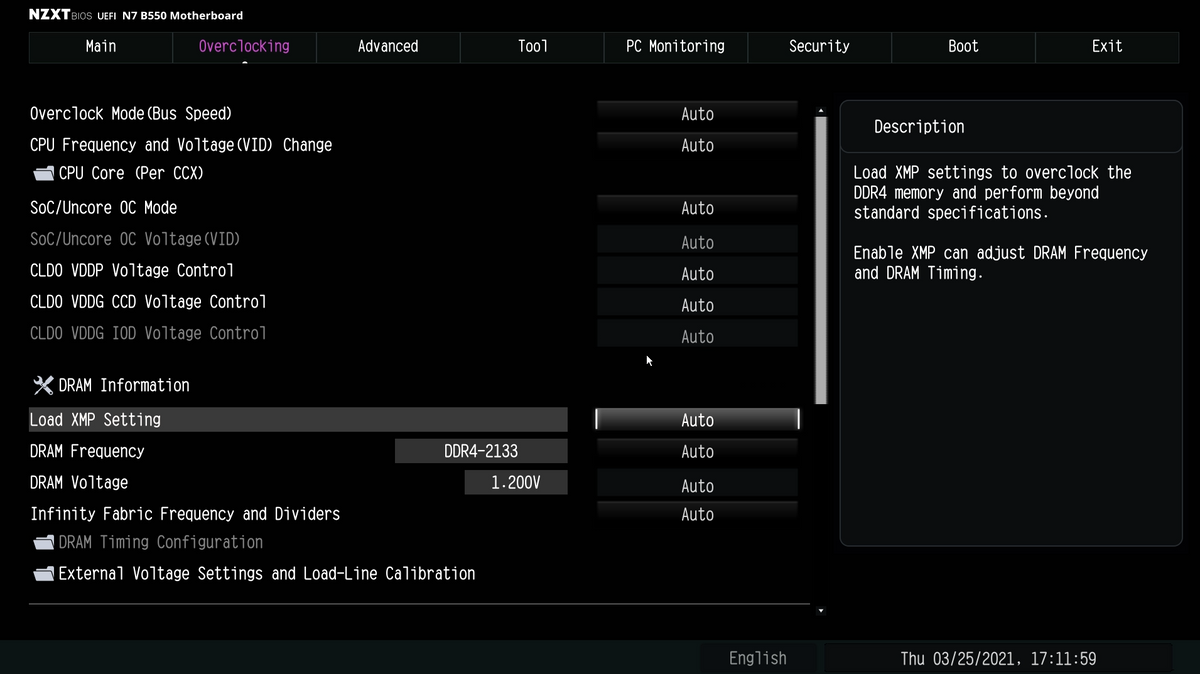
Check the top left of the screen. If it says EZ Mode or Easy Mode, switch to Advanced Mode, either by pressing F7 or clicking the link in the bottom right. The settings you need do not exist in EZ Mode.
Step 2: Disable CSM
Compatibility Support Module lets a modern UEFI boot older legacy operating systems. Almost no gaming PC needs it, and it blocks Secure Boot. Worse, if CSM and Secure Boot are both enabled the PC may not start properly at all.
Open the Boot tab, select CSM (Compatibility Support Module), and set Launch CSM to Disabled.
If you changed this from Enabled, go to the Exit tab, choose Save Changes & Reset, and come straight back into the UEFI before continuing. The next settings will not behave correctly until the board has restarted.
Step 3: Enable the firmware TPM
NZXT prebuilt PCs use the firmware TPM built into the motherboard rather than a separate module. Where it lives depends on your platform:
- AMD systems: Advanced tab, then CPU Configuration, listed as AMD fTPM switch
- Intel systems: Advanced tab, listed as PTT (Platform Trust Technology)
Set Selects TPM device to Enable Firmware TPM.
PTT moves around between boards. Some expose it directly under PCH-FW Configuration, others bury it in a secondary PTT Configuration menu inside that. If it is not where you expect, look one level deeper before assuming your board lacks it.
To confirm it took, go to Trusted Computing in the Advanced tab. It should report TPM 2.0 Device Found with Security Device Support set to Enabled.
Step 4: Enable Secure Boot
Go to the Boot tab and select Secure Boot.
You are looking for Secure Boot state: User with OS Type set to Windows UEFI mode. If that is what you see, go to the Exit tab, choose Save Changes & Reset, and you are done.
If Secure Boot state says "Setup"
This means Secure Boot is not actually active, usually because the Secure Boot keys are not set up. It is a common state on a board that has been reset or had its CMOS cleared.
- Change Secure Boot Mode to Custom.
- Select Key Management.
- The lower section shows the Secure Boot variables including the Platform Key (PK). It will likely read 0/0/No Keys.
- Select Install Default Secure Boot Keys, and click Yes when asked to install factory defaults.
- Exit tab, Save Changes & Reset.
Step 5: Confirm it worked in Windows
Press Windows key + R, type msinfo32 and press Enter. In the System Information window, find Secure Boot State. It should read On.
The other test is simply to launch the game that was refusing to start.
Frequently asked questions
Why do games require Secure Boot?
Anti-cheat systems use it to verify that nothing has tampered with the boot process before the operating system loads. Valorant, EA Sports FC and Battlefield 6 are among the titles that require it, and they will refuse to launch or show an error without it.
Will enabling Secure Boot break my Windows install?
A standard Windows 11 installation on a UEFI system is unaffected, as is a Windows 10 one, though Windows 10 has been out of support since October 2025. The risk case is a system installed in legacy mode with CSM enabled, since disabling CSM changes how it boots. If your PC came from NZXT it was installed in UEFI mode.
Why is the Secure Boot option greyed out?
Almost always because CSM is still enabled, or you are in EZ Mode rather than Advanced Mode. Handle both, then look again.
What is the difference between TPM and Secure Boot?
They are separate features that often get enabled together. TPM is a security chip that stores keys, and on these systems it is firmware-based rather than a physical module. Secure Boot verifies the boot chain. Anti-cheat commonly wants both.
Do I need to reinstall Windows after enabling Secure Boot?
No, provided Windows was installed in UEFI mode, which is standard on any modern system.
My Secure Boot state went back to Setup after clearing CMOS. Why?
Clearing the CMOS wipes the Secure Boot keys along with everything else. Go back into Key Management and install the default keys again. Our guide to clearing CMOS notes this as a step to redo afterwards.
Need a hand?
Screens differ between motherboard makers. If yours does not match, tell us the board model and our team can point you at the right menu. Reach them at NZXT Support.